Home Office Lighting for Video Calls: Look Professional on Every Call
3 Hook Options
- You’ve been on 200 video calls and you know exactly what bad lighting looks like: half your face in shadow, a window behind you turning you into a silhouette. In 3 minutes, this guide fixes all of it.
- You don’t need a ring light. You need the right light in the right place. Here’s the system.
- Good video lighting isn’t about the equipment. It’s about WHERE the light is. Here are the 3 rules.
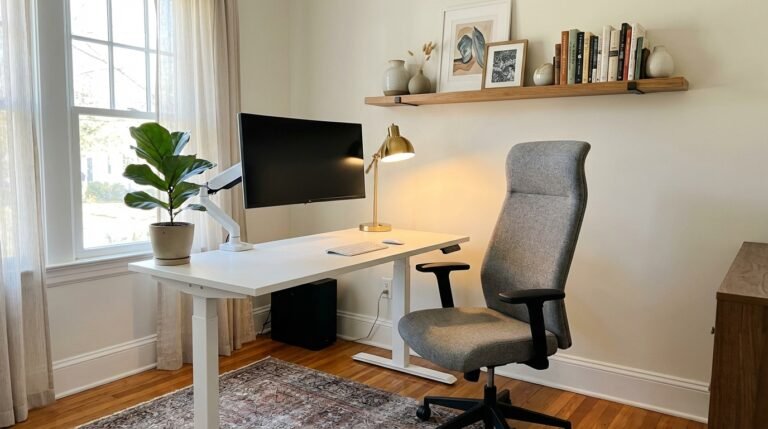
Hero Image: Well-lit home office for video calls — desk with monitor, key light to the side, natural light from window, clean background. Person looks professional and warm. Photorealistic.
You’ve been on 200 video calls. You know exactly what bad lighting looks like:
- Half your face in shadow
- A window behind you turning you into a silhouette
- Overhead light casting raccoon-eye shadows
- Or just flat, dim, unflattering
In 3 minutes, this guide fixes all of it.
Here’s the truth: good video lighting isn’t about the equipment. It’s about WHERE the light is. You can spend $200 on a ring light and still look terrible if you put it in the wrong place.
In this guide, you’ll learn the 3 lighting rules that make anyone look professional on camera, see 3 setup options at different budgets ($0 / $15 / $50), and get the “Video Call Audit” checklist to rate your current setup.
Why You Look Bad on Video Calls (The 3 Mistakes)
Most bad video lighting comes from one of these three mistakes:
Mistake 1: Overhead-Only Lighting
Overhead light creates shadows under your eyes, nose, and chin. This is the “raccoon effect.”
The fix: Add light at eye level, not just from above.
Mistake 2: Backlit (Window Behind You)
When a window is behind you, your camera adjusts for the bright window — and your face goes dark. You become a silhouette.
The fix: Move so the window is in FRONT of you, not behind you.
Mistake 3: No Front Light at All
Without a light source facing you, your face appears flat, dim, and unflattering.
The fix: Add ANY light source behind your camera, facing you.
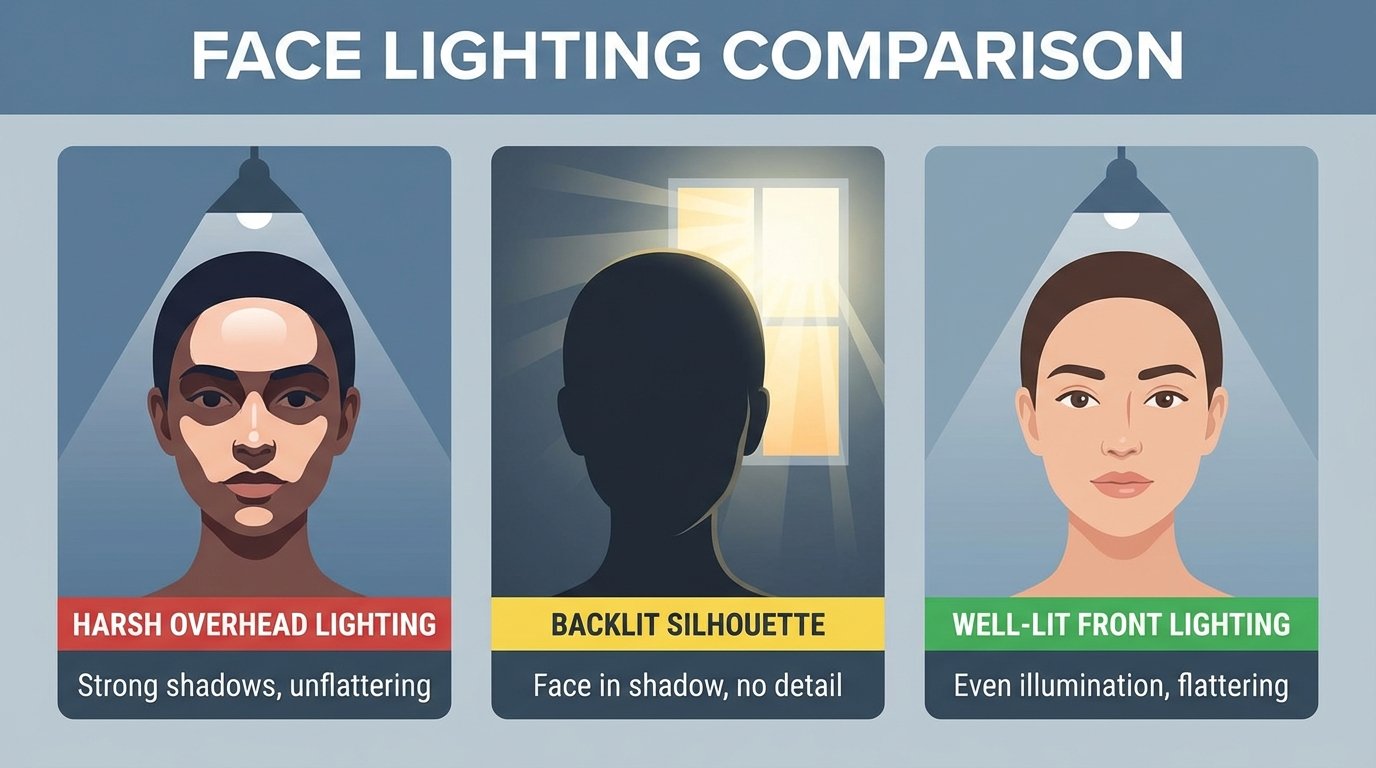
Image: 3-panel comparison — same face: overhead only (bad), backlit window (bad), front-lit (good). Clear, dramatic difference.
For a complete home office setup checklist, lighting is just one piece — but it’s the piece everyone sees.
The 3 Lighting Rules for Video Calls
Memorize these. They’re all you need.
| Rule | What | Why |
|---|---|---|
| Rule 1: Light your face from the FRONT | Light source behind camera, facing you | Even illumination, no shadows |
| Rule 2: Light at EYE LEVEL, not above | Position light at same height as camera | Eliminates under-eye shadows |
| Rule 3: Use WARM light (2700-4000K) | Warm white, not daylight/cool white | Looks natural, not clinical |
> That’s it. If you remember nothing else: front, eye level, warm.
Setup 1 — The Free Window Setup ($0)
If you have a window in front of your desk, you already have studio lighting.
How to do it:
- Position your desk FACING a window (window behind your camera)
- Center yourself in the window’s light
- Move back 2-3 feet from the window for softer light
Best window: North-facing (soft, indirect light all day)
Time of day matters:
- Morning (east light): warm, golden
- Midday: bright, even
- Afternoon (west light): can be harsh — use a sheer curtain
The $0 upgrade: Hang a sheer white curtain to diffuse harsh light.
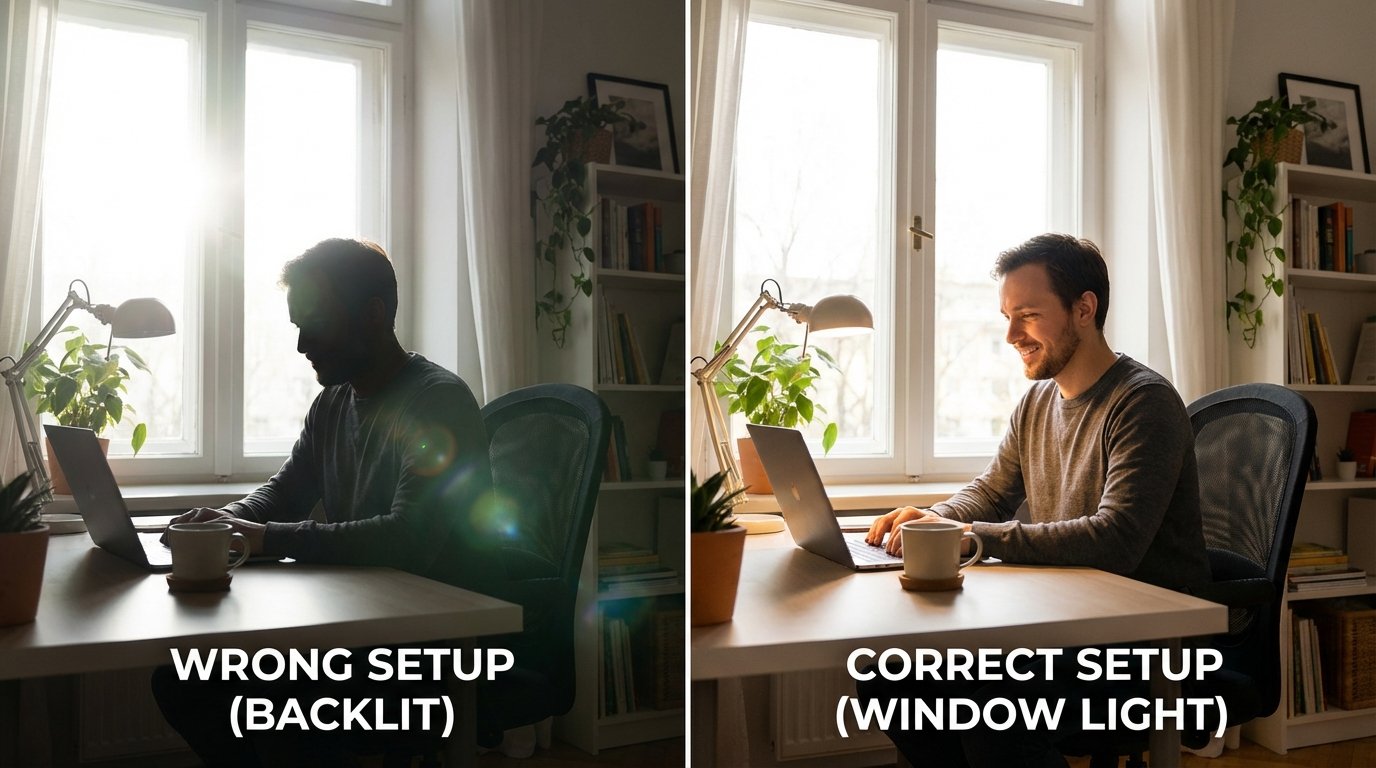
Image: Desk facing window — soft, diffused natural light illuminating face. Before (desk facing away from window, backlit) vs. after (desk facing window, beautifully lit).
> “If you have a window in front of your desk, you already have studio lighting.”
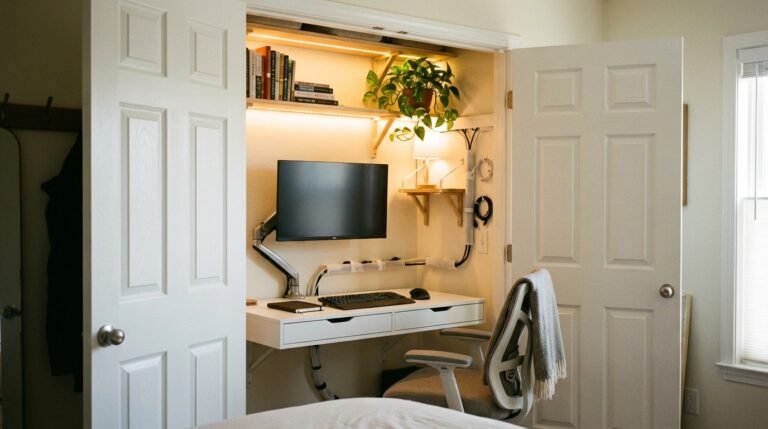
If you’re working in a closet office, lighting is even more critical — you won’t have natural light, so you’ll need Setup 2 or 3.
Setup 2 — The $15 Desk Lamp Upgrade
If you don’t have a window or need evening call lighting, a desk lamp is your answer.
What to buy:
- LED desk lamp with adjustable color temperature
- Price: $12-18 on Amazon
- Look for: 2700K-4000K range, dimmable
How to position it:
- Place lamp slightly above eye level
- Position slightly to the left or right of your camera (not directly in front)
- Angle it at YOUR FACE, not your desk
The mistake: People aim desk lamps at their keyboard. You’re lighting YOU, not your work.
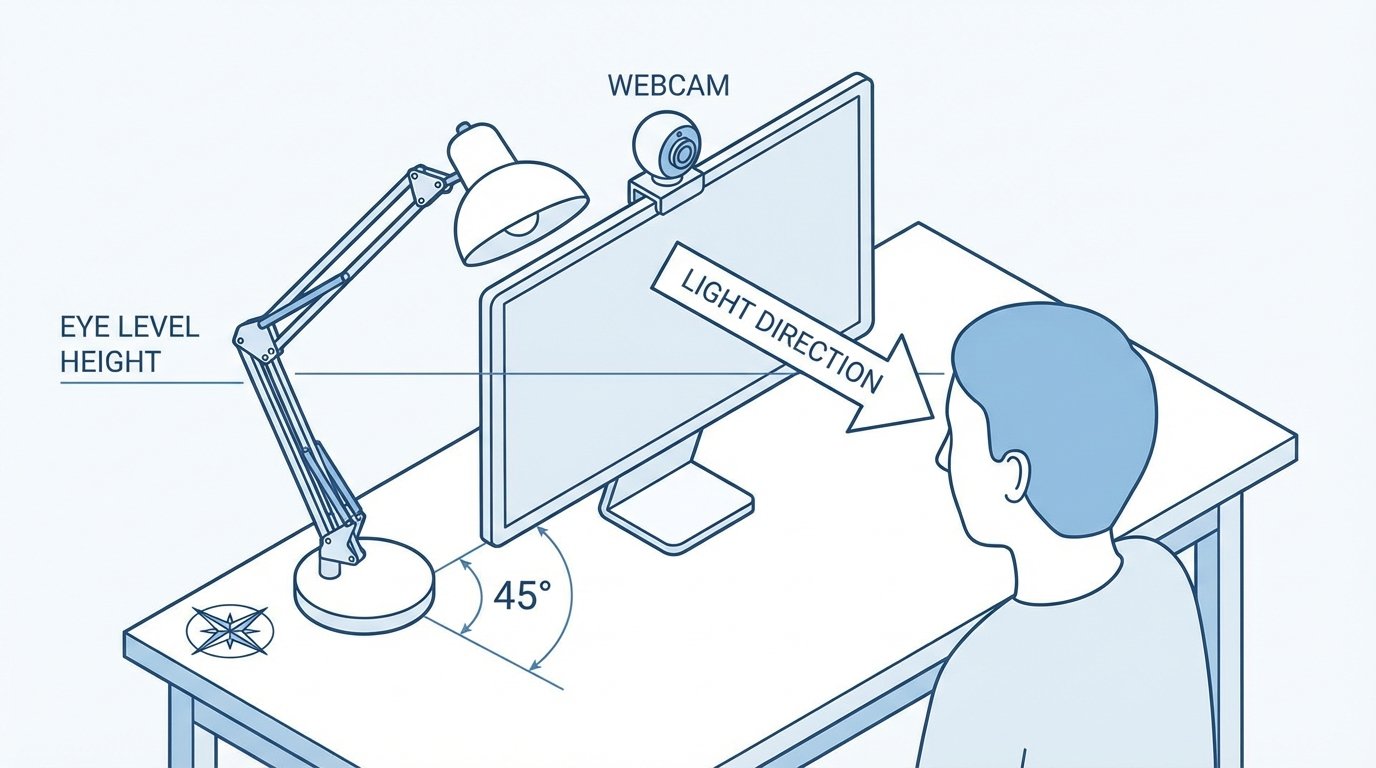
Image: Desk lamp positioned as key light — showing angle, height, and direction relative to webcam. Annotated with arrows.
Color temperature: Set your lamp to 3500-4000K (warm white). Avoid 5000K+ daylight settings — they look clinical and blue on camera.
Setup 3 — The $50 Pro Setup
For the full professional look, add a 3-point lighting setup:
What you need:
- Key light: LED panel ($20-30) — positioned at 45° to your left
- Fill light: Your desk lamp on the right side, slightly dimmer than the key
- Background light: LED strip behind monitor or small lamp behind you
The result: Professional, dimensional lighting with no shadows.
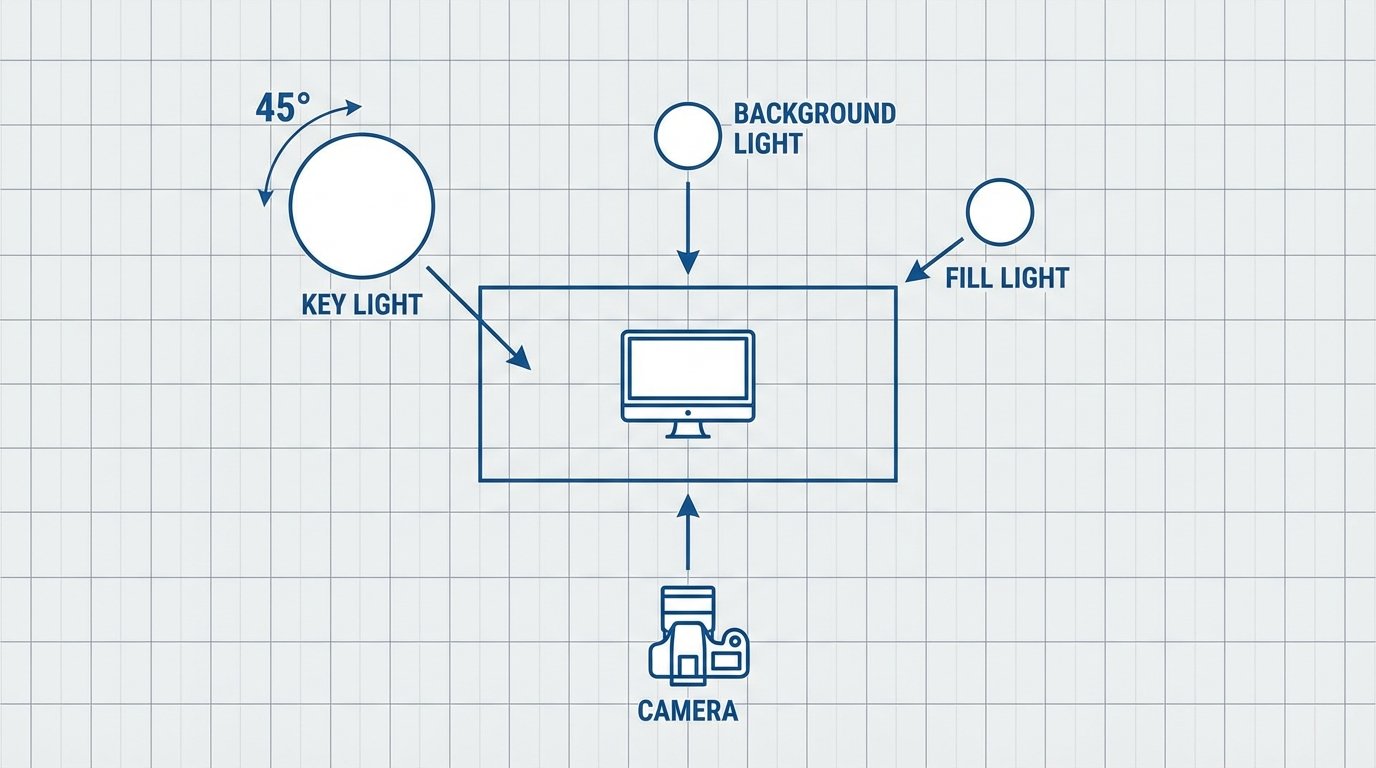
Image: 3-light setup diagram — bird’s-eye view showing desk, camera, key light at 45°, fill light, and background light. Clean diagram.
This pairs perfectly with a complete home office setup for a workspace worth showing off.
The Ring Light Truth (When to Use One — and When NOT To)
Ring lights are popular, but they’re not always the answer.
Ring lights ARE good for:
- ✅ Direct-to-camera calls where you face the camera straight-on
- ✅ Beauty/makeup content
- ✅ Streaming close-up shots
- ✅ Quick, portable lighting
Ring lights are NOT good for:
- ❌ People with glasses (creates halo reflections IN your glasses)
- ❌ Anyone more than 3 feet from the ring (light becomes weak)
- ❌ Natural-looking lighting (ring lights have a specific “look”)
> If you see a ring reflected in your glasses on Zoom, that’s THE sign. A ring light is making you look worse, not better.
The alternative: An LED panel or well-positioned desk lamp often looks MORE natural than a ring light for standard WFH video calls.
Background Lighting (The Secret Weapon)
Your background matters as much as your face. A dark, flat background makes even well-lit faces look worse.
Simple background upgrades:
- One warm lamp behind you (adds depth)
- LED strip behind your monitor ($10-15, creates ambient glow)
- Bookshelf with styled items (adds interest and professionalism)
Avoid:
- Bright windows behind you
- Cluttered, messy backgrounds
- Harsh overhead fluorescent lights in frame
The “Zoom Background Kit”:
Clean desk + one bookshelf + one plant + warm lamp = professional
For more on closet office background styling, the same principles apply — control what’s visible behind you.
Video Call Lighting Audit
Rate your current setup:
| Question | Yes/No |
|---|---|
| Is your primary light source in FRONT of you? | ☐ |
| Is the light at EYE LEVEL (not overhead only)? | ☐ |
| Is the light WARM (not blue/cool white)? | ☐ |
| Can you see both sides of your face evenly lit? | ☐ |
| Is your background visible (not you as a silhouette)? | ☐ |
| Are you free of harsh shadows under eyes/nose? | ☐ |
| If you wear glasses, is there NO ring reflection? | ☐ |
| Score: /7 |
Scoring:
- 0-3: Your colleagues can tell. Fix this immediately.
- 4-5: Getting better. One more adjustment.
- 6-7: You look like a news anchor. Well done.
FAQ
What is the best lighting for video calls at home?
The best lighting is a light source (window or lamp) positioned in front of you at eye level with warm color temperature (2700-4000K). If you have a window, face it. If not, use a desk lamp positioned beside your camera, aimed at your face.
Do I need a ring light for Zoom?
Not necessarily. Ring lights work well for some people but create problems for glasses-wearers (reflections) and can look unnatural. A well-positioned desk lamp or LED panel often looks better for typical video calls.
What color temperature is best for video calls?
Warm white (2700-4000K) is best for video calls. Avoid daylight bulbs (5000K+) which make skin look blue and clinical on camera. Match your lighting to the time of day — warmer in evening, slightly cooler in midday.
How do I fix shadows on video calls?
Shadows usually come from overhead-only lighting. Add a light source at eye level (lamp or window) in front of you. This fills in under-eye shadows and creates even illumination on your face.
Where should I put my desk lamp for video calls?
Position your desk lamp slightly above eye level, slightly to the left or right of your camera (not directly in front of it). Angle it at your face, not at your desk or keyboard.
What to Read Next
- Home Office Setup Checklist — Build the complete workspace
- Closet Office Ideas — Small space, big productivity
- Bedroom Colors for Better Sleep — Light science applies here too