Kitchen Pantry Organization Checklist: From Chaos to Magazine-Worthy
If you’ve ever bought mustard only to discover three open bottles already in your pantry, this post is for you.
The average pantry is 73% disorganized — and that disorganization costs you money (duplicate purchases), time (digging for things), and sanity (stuff falling on you).
Here’s a 5-step system that transforms your pantry in one weekend, with product picks at three budget levels.
📌 Save the 5-Zone layout — it’s the system that keeps your pantry organized permanently.

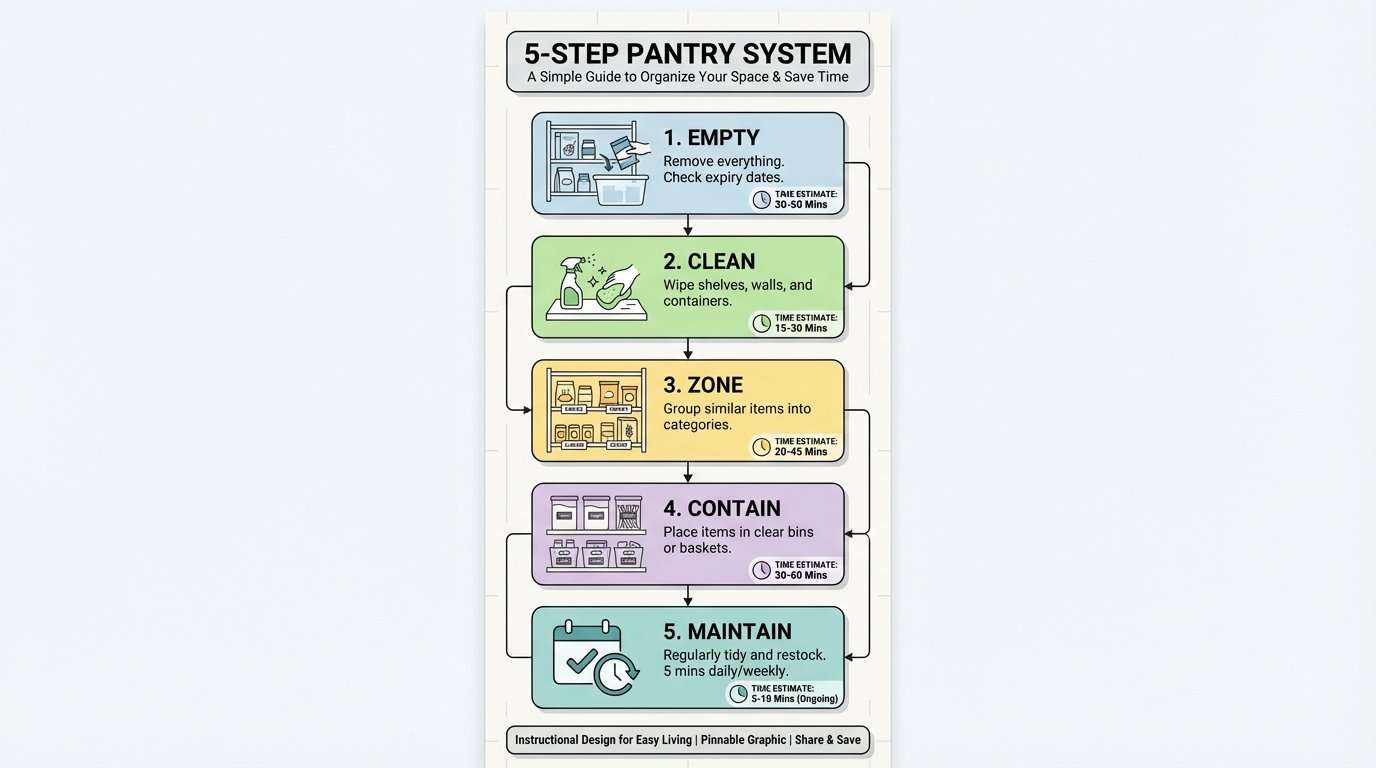
The 5-Step Pantry Overhaul System
Here’s what we’re doing:
| Step | What | Time |
|---|---|---|
| 1 | Empty Everything & Audit | 1 hour |
| 2 | Clean & Measure | 30 minutes |
| 3 | Create 5 Zones | 30 minutes (planning) |
| 4 | Contain & Label | 2-3 hours |
| 5 | Maintain | 5 min/week forever |
Total time: One weekend afternoon
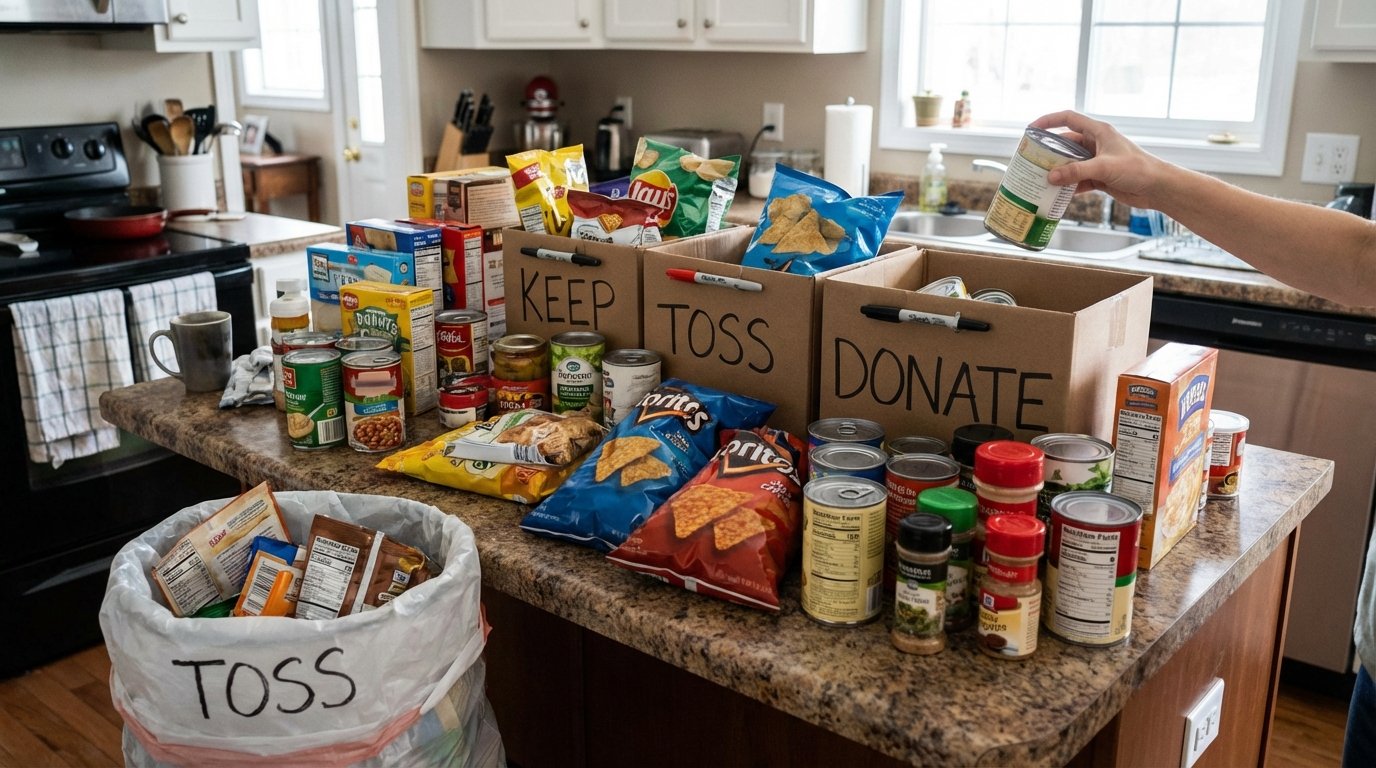
Step 1 — Empty Everything & Audit
Take EVERYTHING out. Yes, everything. Put it on your counter or table.
Now sort into 4 piles:
| Pile | What Goes Here |
|---|---|
| ✅ Keep | Not expired, you’ll actually use it |
| ❌ Toss | Expired, stale, mystery items from 2019 |
| 🎁 Donate | Unopened, won’t use (food bank will take it) |
| 🔄 Relocate | Doesn’t belong in pantry (appliances, random stuff) |
The sniff test for spices: If it doesn’t smell like anything, it’s done. Spices lose potency after 1-2 years.
Reality check: You’ll throw away 15-30% of what’s in your pantry. That’s normal. Let it go.
For a whole-home approach, see our declutter checklist room-by-room guide.
Step 2 — Clean & Measure
Before you put anything back:
- Wipe every shelf with all-purpose cleaner
- Line shelves (optional but recommended — $5-10 for liner)
- Measure everything:
- Shelf width
- Shelf depth
- Height between shelves
Write these measurements in your phone. You’ll need them when you shop for containers.
If your kitchen needs more than just pantry organization, see our kitchen refresh without renovation guide for the full treatment.
Step 3 — Create 5 Zones (The System)
This is the part most people skip — and it’s why their pantries descend back into chaos.
The 5-Zone System:
| Zone | What Goes Here | Shelf Position |
|---|---|---|
| Zone 1: Daily | Cereal, snacks, bread, peanut butter, coffee, tea | Eye level (most accessible) |
| Zone 2: Cooking | Oils, vinegars, spices, sauces, pasta, rice, grains | Just above eye level |
| Zone 3: Baking | Flour, sugar, baking soda, vanilla, chocolate chips | Dedicated shelf or lower |
| Zone 4: Canned/Jarred | Soup, beans, tomatoes, broths, pickles | Bottom shelf (heavy) |
| Zone 5: Bulk/Backup | Extra items, bulk purchases, emergency stock | Top shelf or back of deep pantry |
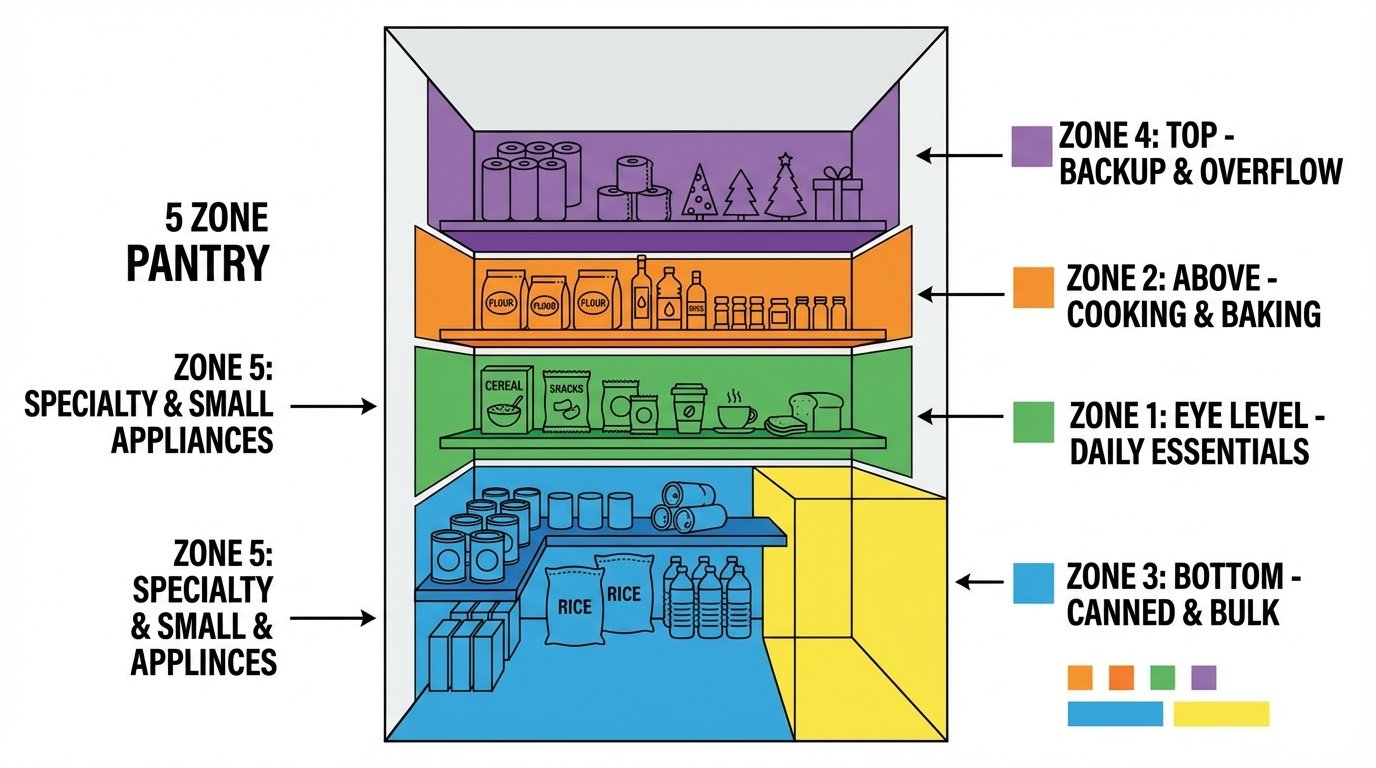
The golden rule: Things you use DAILY go at eye level. Things you use monthly go high or low.
This zone system complements the kitchen counter decor ideas guide — your whole kitchen should work as a system.
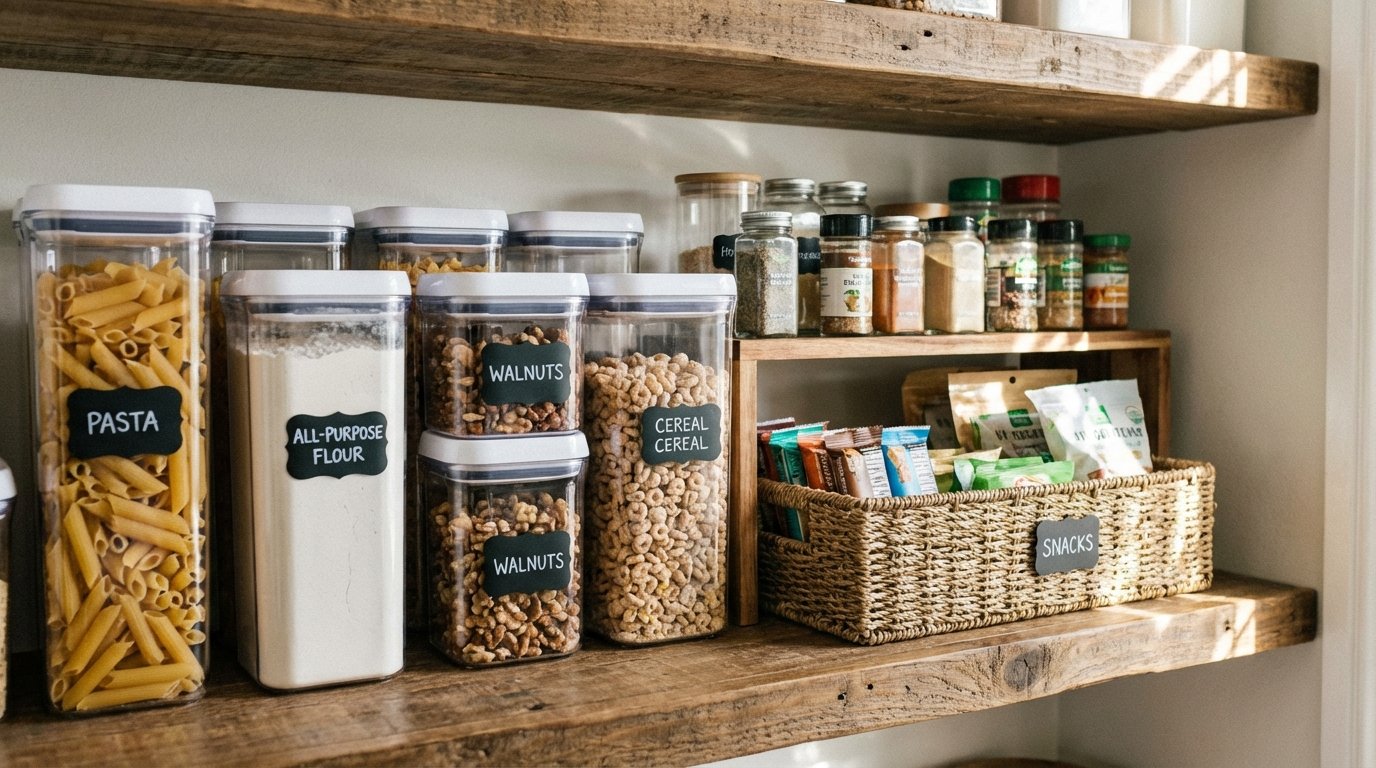
Step 4 — Contain & Label
Now we make it pretty AND functional.
The Container Strategy
Decant dry goods: Flour, sugar, rice, pasta, cereal, oats → clear containers
- You can SEE when you’re running low
- Containers stack efficiently
- No half-open bags spilling everywhere
Use baskets for categories: Snack bars, tea bags, sauce packets, granola bars
- Handles make them easy to pull out
- Keeps small items from scattering
Lazy Susans for corners: Spices, oils, vinegars, sauces
- Nothing gets lost in the back
- Easy to spin and find what you need
Shelf risers: Double your visible space
- Cans two rows deep = see everything
- Works for spices, jars, small containers
The Label System
Options:
- Chalkboard labels ($5 set) — write and rewrite
- Vinyl sticker labels ($8) — clean, uniform look
- Label maker ($15) — professional, durable
The trick: Label the SHELF, not just the container. Use masking tape or a label strip on the shelf edge. This tells anyone (including future you) where things go.
Labels aren’t decoration. They’re instructions for your future self and anyone else putting groceries away.
Product Picks by Budget
| Item | Budget ($15) | Mid-Range ($40) | Splurge ($80) |
|---|---|---|---|
| Containers | Dollar Tree canisters | Amazon glass set ($28) | OXO Pop set ($55) |
| Labels | Masking tape + marker | Chalkboard labels ($5) | Label maker ($15) |
| Baskets | Dollar Tree bins | Woven baskets ($10 each) | Acrylic bins ($20 each) |
| Risers | DIY (books or boards) | Bamboo risers ($8) | Expandable tiered shelf ($15) |
| Lazy Susan | (skip for budget) | Basic turntable ($6) | 2-tier turntable ($12) |
See more budget-friendly ideas in our budget home makeover under $500 guide.
Step 5 — The Maintenance Rule (Stay Organized Forever)
Organizations fail because people organize but don’t maintain. Here’s the 3-minute weekly system:
Every Sunday (3 minutes):
- Scan the pantry
- Pull items forward (nothing hiding in the back)
- Note what’s low for your grocery list
The “First In, First Out” rule:
- New items go BEHIND old items
- Use older items before opening new ones
- This prevents expired-food discovery in 2028
Monthly (2 minutes):
- Quick expired-item check
- Toss anything past date
- Reassess zones if something isn’t working
That’s it. 5 minutes a week keeps your pantry organized permanently.
Small Pantry Adaptations
Working with a pantry under 3 feet wide? Here’s how to make it work:
Use the back of the door: Over-door rack ($15-25) holds spices, oils, snacks
Go vertical: Stack containers on top of each other, use tall narrow containers
Pull-out bins: On bottom shelf, use bins you can slide out to reach the back
Magnetic spice rack: On side wall inside pantry door
The truth: A 2-foot organized pantry holds 2x more than a 4-foot pantry in chaos.
Printable Pantry Organization Checklist
📦 SUPPLIES
- [ ] Clear containers (measure shelf depth first!)
- [ ] Labels (chalkboard, vinyl, or label maker)
- [ ] Baskets (2-4 for categories)
- [ ] Shelf risers (optional)
- [ ] Lazy Susan (optional)
- [ ] Shelf liner (optional)
🗑️ STEP 1: EMPTY & AUDIT
- [ ] Remove everything
- [ ] Sort: Keep / Toss / Donate / Relocate
- [ ] Check expiration dates
- [ ] Sniff-test spices
🧹 STEP 2: CLEAN & MEASURE
- [ ] Wipe all shelves
- [ ] Install shelf liner (optional)
- [ ] Measure: width, depth, height between shelves
- [ ] Record measurements in phone
📍 STEP 3: CREATE 5 ZONES
- [ ] Zone 1 (eye level): Daily items
- [ ] Zone 2 (above): Cooking essentials
- [ ] Zone 3 (dedicated): Baking supplies
- [ ] Zone 4 (bottom): Canned/jarred goods
- [ ] Zone 5 (top/back): Bulk and backup
📦 STEP 4: CONTAIN & LABEL
- [ ] Decant dry goods into containers
- [ ] Organize categories into baskets
- [ ] Add Lazy Susans to corners
- [ ] Label containers AND shelves
- [ ] Install shelf risers where helpful
✅ STEP 5: MAINTAIN
- [ ] Sunday: 3-minute scan and pull-forward
- [ ] Apply “First In, First Out” rule
- [ ] Monthly: expiration check
FAQ: Kitchen Pantry Organization
How do I organize my kitchen pantry?
Follow the 5-step system: 1) Empty everything and audit (toss expired items), 2) Clean shelves and measure for containers, 3) Create 5 zones (daily at eye level, heavy items at bottom), 4) Decant dry goods into clear containers and label, 5) Maintain with a weekly 3-minute scan. Complete in one weekend.
What is the best way to organize pantry shelves?
Use the 5-Zone system: Zone 1 (daily items) at eye level, Zone 2 (cooking) just above, Zone 3 (baking) on a dedicated shelf, Zone 4 (canned goods) at bottom, Zone 5 (backup stock) at top or back. Items you use most should be easiest to reach.
What containers are best for pantry organization?
Clear containers so you can see contents and quantity. Square/rectangular shapes maximize shelf space better than round. OXO Pop containers are the splurge choice ($55 set), Amazon glass containers are mid-range ($28 set), Dollar Tree canisters work for budget ($1 each). Always measure shelf depth before buying.
How do I organize a small pantry?
Use the back of the door (over-door rack), go vertical with stackable containers, use pull-out bins on the bottom shelf, and add a magnetic spice rack to the side wall. A 2-foot organized pantry holds more than a 4-foot chaotic one. Focus on zones and containers, not just shoving things in.
How do I keep my pantry organized long-term?
The 3-minute weekly maintenance: scan shelves, pull items forward, note what’s low. Apply “First In, First Out” (new items go behind old). Monthly: quick expiration check. Organizations fail because people organize once but don’t maintain. The maintenance takes 5 minutes a week.
What to Read Next
- 👉 Full kitchen refresh: Kitchen refresh without renovation
- 👉 Counter styling: Kitchen counter decor ideas
- 👉 Budget home: Budget home makeover under $500
- 👉 First apartment: First apartment essentials checklist
📌 Print our 5-Zone Pantry Checklist and tackle Step 1 this Saturday morning. By Sunday night, you’ll never lose the mustard again.